Are you using google cloud WordPress hosting for your website? Although WordPress provides a lot of settings to manage the site sometimes you have to modify the WordPress file in the host server. In this tutorial, we learn how to modify the file using FTP so that you didn’t get google cloud FTP permission denied exception.

Why Permission denied in FTP exception occurred –
Suppose you want to make some changes in a file in google cloud so you download that file in your local machine and make the change and when you try to upload the received file again on the server you get below permission denied FTP exception –
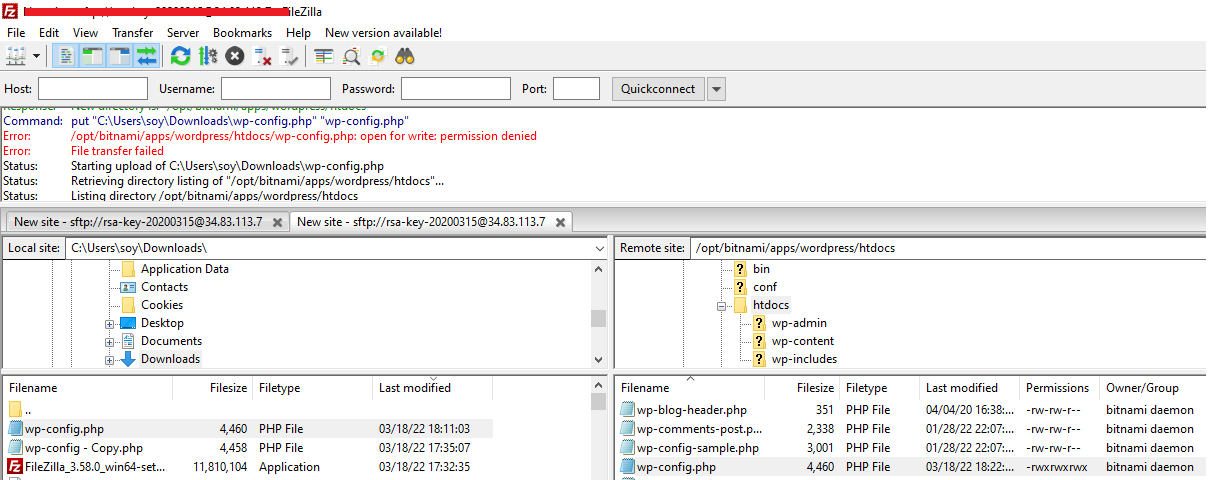
The reason is you don’t have sufficient permission to modify the file on the google cloud server that’s why this “Open for Write Permission denied” exception occurred.
So what is the solution?
How to fix Google cloud FTP permission denied Exception
Follow the below steps to fix this exception –
- Login to your google cloud platform (GCP) with your account.
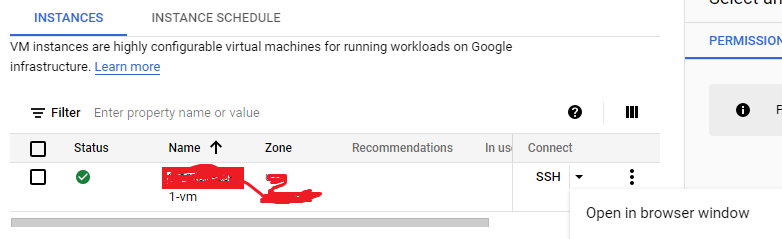
- Now click on the hamburger icon and click on the “Compute Engine” then “VM Instance” option and connect to the SSH console Open in Browser window same as below–
3. The SSH console panel will open and check your current permission using the below command –
![]()
stat -c "%a %n" /directorypath
Note – Kindly change the directory path where to need to update the file
- One 3 digit number will appear on the screen that’s the permission level you have so you need higher permission. Run the below command to change your permission level –
sudo chmod 777 /opt/bitnami/apps/wordpress/htdocs/wp-config.php
Note – Here 777 means anyone can modify the file. I am modifying the permission level of the “wp-config.php” file.
- Now open the FileZilla FTP and connect to your WordPress site and navigate to the directory location where you want to modify the file. Download the file and make the necessary changes and upload it back to the cloud server. Now it should be uploaded successfully –
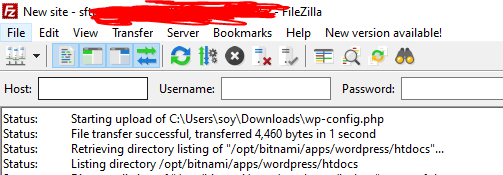
For this tutorial, I have modified the “wp-config.php” file and uploaded it back to my VM instance using FTP.
- Check your site if your changes are working as expected kindly change the permission level back to the previous state from the security point of view.
Run the below command to change the permission level –
sudo chmod 644 /opt/bitnami/apps/wordpress/htdocs/wp-config.php
Note – Here 644 represent read to everyone except the Owners.
- Check the permission level again by running the below command to verify it is changed or not.
stat -c "%a %n" /filepath
8. Now close the SSH console panel and we are good.
If you have to modify any other file in the future then repeat all the above steps.
Conclusion
This is how you can change your permission level in google cloud and upload the updated file to avoid Google cloud FTP permission denied exception.